8.1 recovery environment not found. Windows System Restore. How to run RAM diagnostics in Windows
The Windows 8 recovery disk or Windows 8.1 recovery disk is designed to troubleshoot problems with the operating system when the computer cannot boot. From the recovery disk, recovery tools are launched to carry out work to restore Windows functionality.
While working on a computer, sometimes problems arise due to various reasons. Malfunctions occur due to abnormal operation of equipment, software errors, and, perhaps, the most common reason: incorrect user actions.
If serious problems occur, the user can launch system recovery in different ways:
- Restore system files and settings using previously created system restore points.
- Restoring your computer (Refresh) without deleting personal data.
- Removing all data and reinstalling (Reset) Windows.
These recovery options are launched directly from the operating system. If it is impossible to start Windows, it is possible to start recovery by booting from a bootable USB flash drive or from a DVD with an operating system image, and if the user does not have a Windows image, then by booting from a recovery disk.
An installation DVD or bootable USB flash drive with Windows 8.1 (Windows 8) can also be used as a recovery disk by entering the operating system recovery environment.
You will need a Windows 8.1 system repair disc in the following cases:
- the user does not have an installation disk or bootable USB flash drive with the Windows operating system1 (Windows 8);
- in case of a serious computer failure;
- if Windows cannot boot.
After booting from the recovery disk, using the recovery tools, the user can carry out the necessary troubleshooting work on the computer.
Creating a Windows 8.1 Recovery Disc
The user can independently create a Windows 8.1 recovery disk and burn it to a USB flash drive.
When creating a Windows 8.1 recovery disc, follow these steps:
- Go to “Settings”, then click on “Control Panel”.
- Go to “Recovery”, select “Create a recovery disk”.
- The next window asks you to copy the recovery partition from your computer to the recovery drive. If such a partition exists on the computer, the user can check the box next to “Copy the recovery partition from the computer to the recovery disk” in order to use it to restore or return the computer to its original state.
- Click on the "Next" button.

- The application will check your computer for connected drives. In Windows 8, it is possible to burn to a CD/DVD disc (to do this you will need to run another application); in Windows 8.1, a recovery disk is created only on a flash drive.
- Then a window opens with available drives. Select the desired USB drive. The size of the flash drive must be at least 256 MB; all information from the USB device will be deleted.

- Agree to delete all data from the flash drive. Transfer data (if any) from the USB device to another drive in advance.
- Click on the “Create” button.
- Next, the service files are formatted and copied.
- The recovery disk is ready, click on the “Finish” button.

Remove the USB flash drive containing the Windows 8.1 recovery disc from the computer.
A bootable USB flash drive with a Windows 8.1 system recovery disk has been created. Now, in the event of an operating system failure, the user will have a chance to return the computer to working condition.
Windows 8.1 bootable USB flash drive for system recovery
Now let's see how to start recovery in Windows 8.1 from the installation disk or from a bootable USB flash drive. The recovery disk (not the installation disk) will start in a similar way, only without the windows for installing Windows 8.
Select in the BIOS or UEFI the priority to boot the system from the connected disk (USB drive or DVD), or immediately enter the boot menu to start the disk from there.
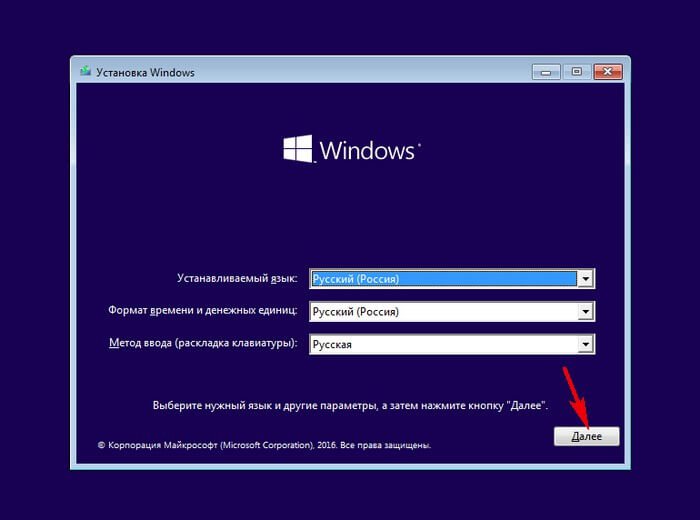
In the “Install Windows 8” window, click on the “Next” button. Here, by default, the language and keyboard layout are already selected correctly.

In the next window, click on “System Restore”.

The “Select Action” window offers two action options:
- Diagnostics - system recovery, returning the computer to its original state, or using additional tools.
- Turn off computer.
Select Diagnostics.

The Diagnostics window offers the following actions:
- Restore - restore the system while preserving personal files.
- Reset to original state - reinstallation of the system with loss of personal data.
- Advanced options - use other recovery tools.
Select Advanced Options.

The following system recovery tools are available in the Advanced Options window:
- System Restore - restore Windows using previously created restore points.
- System image recovery - restores Windows using a previously created backup system image.
- Startup Repair - fixes a glitch that prevents the operating system from loading.
- Command Prompt - Launch a command prompt to troubleshoot problems.
Choose the right tool to solve your computer problem.

Conclusions of the article
The user can create a bootable Windows 8.1 (Windows 8) recovery disk, which will help run system recovery tools if serious problems occur with the computer and Windows cannot start.
The Windows 8.1 and 10 recovery environment in the form of a menu with the inscription “Select action” and, accordingly, with a list of possible actions on a blue screen background is the recovery environment for these versions of the operating system, an evolutionary continuation of the menu on a black screen background with additional boot options, familiar to many according to Windows 7. The recovery environment is designed to solve problems that arise in Windows 8.1 and 10; it offers access to some standard tools, the use of which can prevent the use of a radical method - reinstalling the system. In the recovery environment you can:
- run automatic troubleshooting for problems that may be preventing the system from booting;
- use the ability to roll back Windows to a restore point or state from a backup image, if these were previously created by standard system tools;
- launch command line;
- launch into the system using various boot parameters;
- resort to a radical method of solving problems that have arisen in the form of returning the computer to its original state;
- in some cases, return the current version of the system to the previous version.
The predecessor environment included in Windows 7 is launched by pressing the F8 key while the computer device is booting. This method is extremely convenient in case of a sudden system failure and, as a result, its inability to boot. But this method does not work with Windows 8.1 and 10. There are Shift+F8 keys for these purposes, but they won’t be able to be used in practice in every case due to the quick launch of the two latest versions of Windows. The accelerated launch of versions 8.1 and 10 actually makes it impossible to use this keyboard shortcut, especially on computer devices with SSD drives.
How to get into the recovery environment of the last two versions of Windows? From a running system this can be done in several ways:
- hold down the Shift key and click the restart button;
- enter into the command line:
shutdown.exe /r /o /f /t 00
- In the standard “Settings” application, open “Update and Security”, then select “Recovery”, and then “Special boot options”.
In emergency cases, when Windows 8.1 or 10 refuses to boot, you can use either installation media of one of these versions or prepared tools from the system itself to enter the recovery environment. In some cases, if the system suffers a major crash and cannot boot, the recovery environment itself will start as the only option.
Access to the recovery environment can be organized in another way - by installing two or more Windows with the condition that version 8.1 or 10 will be installed last and, accordingly, it is their bootloader that will offer a choice of operating systems for further launch. This way, the implemented ability to enter the recovery environment will be always available when the computer boots. And, accordingly, it can be quickly used in the event of a sudden occurrence of system problems without the need to use bootable media. Plus, we will have the advantage of an alternative operating system, which, without being damaged itself, can help revive the problematic system.
The operating system boot selection menu implemented by Windows 8.1 and 10 bootloaders, in addition to the list of systems themselves, also contains the option to change boot parameters and some other parameters.
These other parameters

and is the recovery environment.

When implementing the boot menu of several operating systems on UEFI computers, the recovery environment may also have an additional option for selecting the computer boot device.
Can the second, third, and so on Windows, at least in direct implementation, or as access to the recovery environment in the bootloader menu, become a panacea for all cases of problems with the software part of the computer? If two or more Windows are installed on different partitions of the same hard drive, and they have a common bootloader, then no. Windows bootloaders have an unpleasant feature - they become corrupted. And it’s not always possible to revive Windows using its standard tools. In this regard, there will be much more use from. By the way, some of them (based on WinPE), in addition to third-party Windows resuscitation tools, may contain some of its standard capabilities, including launching a recovery environment. Among these is a resuscitation Live disk, and, by the way, it is another way to access the recovery environment of a non-booting Windows.
Have a great day!
The development of technology, the emergence of new generations of components that work much faster and are more economical, makes it possible to extend the life of computers and delay the need to purchase a new, more productive model. One option for such an upgrade would be to replace a traditional hard drive with its solid-state counterpart.
Considering the excellent speed characteristics of such disks, using them as system disks is the best solution. We will tell you about possible problems that may arise when transferring a system partition from a classic hard drive to an SSD. We will talk about the Windows 8 system installed on a Lenovo laptop, and similar issues of modernization, repair, and computer setup Apple We'll leave it for another time.
Wim image binding
Windows 8 has a factory reset mode when problems occur that cannot be fixed by any other means. This will entail the loss of all installed programs, settings, personal data, etc., but all defects in operation will disappear, and the system will return to its original form.
When replacing a disk and after the accompanying procedure of transferring the system from an old disk to a new one, it happens that the binding to the Windows 8 system recovery environment of the OS wim image with factory settings is broken. It is contained in the hidden Recovery partition. The result of violating this binding is the impossibility of rolling back the system to factory settings.
Next, we will describe the process of how to restore the wim image binding. For example, we used a Lenovo laptop with a UEFI BIOS. The algorithm of action will be similar for devices from other manufacturers. The difference may lie in the names of menu items and some other little things.

If you don’t have confidence in your abilities, and what is described below looks too complicated, then it would be best to go to the launch.rf workshop computer repair in Otradnoye and find out when they can help you with this problem.
You need to go to the Disk Management utility. There we will see that all partitions, including the hidden Recovery, on the system disk are intact.
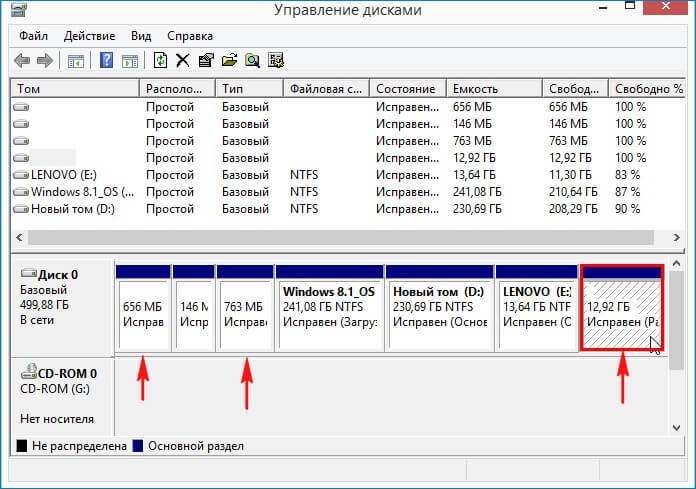
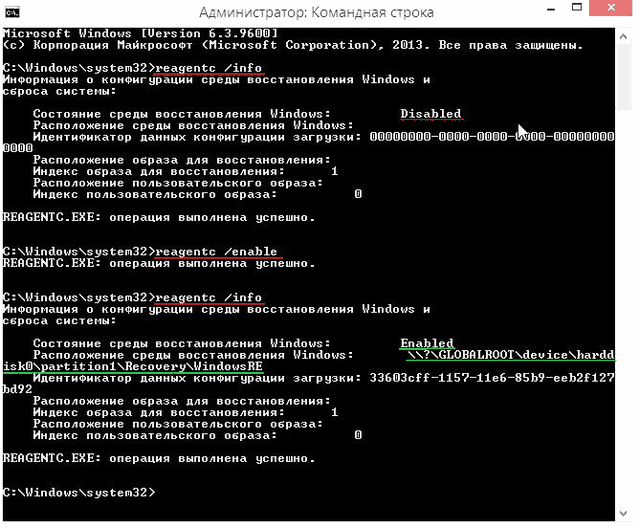
First of all, make sure that the recovery environment is enabled by entering “reagentc /info” in the command line.
In response, we will receive a message that the recovery environment is disabled. This happened after migrating the system from an old hard drive to an SSD. You need to turn it on. The command “reagentc /Enable” is intended for this.
The REAgentC program will report that the recovery environment (Winre.wim file) is enabled, and its standard location is in the hidden first partition of the disk - \\?\GLOBALROOT\device\harddisk0\partition1\Recovery\WindowsRE. The problem is that the location of the recovery image is unknown. This means that if you use Push-Button Reset Overview, the Windows installation DVD will be used as the image.
Previously, we established that we have all the necessary partitions, including the hidden Recovery with the wim image, and the problem is the missing connection between this image and the system recovery environment. Let's start restoring the connection. You will need a command line where you need to enter several commands in sequence:
- "Diskpart".
- “lis vol” – a list of all disk partitions is displayed.
- “sel vol 4” – select the partition containing the desired recovery image.
- “assign letter M” – assign the letter “M” to section 4.
- “exit” – exits the Diskpart utility.

Now you should open “Explorer”, in which the “M” drive will appear. To control, you can check that the “install.wim” file containing the factory image of the system is located on this drive.

Let's return to the command line and continue working. “M:” – with this command we go to the “M” drive.
The next directive is “attrib /s /d”. With its help, the full paths of files located in the directory and subdirectories on a given disk and their attributes are displayed on the screen. We see that the “Factory” subdirectory we are interested in has attributes S “system”, H “hidden”, R “read only”, which we do not need and need to be cleared.

To do this, enter the commands:
- “cd OKRBackup\Factory” – change the current directory to L:\OKRBackup\Factory.
- “attrib -s -h -r /s” – remove the listed attributes from all files in this directory.
- “attrib /s /d” – control that attributes have been removed.

“C:” – goes to the system drive.
Now we bind the wim image with the command “reagentc /setosimage /path M:\OKRBackup\Factory /index 1”. If everything went well, then when you roll back to the original settings, information from the desired disk partition (from the wim image) will be used. To verify this, you can run the command "reagentc /INFO".

Push-Button Reset Overview (one-button system reset)
Just in case, we will briefly describe the procedure for returning to factory settings. You need to go to “Options”.


Click the “Start” button in the “Remove all data and reinstall Windows” item.

A warning window will appear telling you what action will be taken. You need to click the “Next” button.

The system rollback procedure to factory settings will begin.
If the OS does not start
You need to boot from the Windows 8 installation media, click “Next”.
Click "System Restore".

In the “Select action” window that opens, click “Diagnostics”.

Select the “Return the computer to its original state” mode.


Then select “Windows 8.1”.

The last window will open, in which you can click the “Return to original state” button.

The process of restoring the system to factory settings will begin.

Lost in the three pines of the Windows recovery environment. Today I'll show you an easy way to navigate Windows RE, and also talk about a way to create a flash drive with RE, which was not previously available in Windows.
Those two people had the same problem - they tried to deploy the system from a backup image, but it was not in Windows RE. Of course, carefully reading the instructions would save them time and nerves. However, this does not eliminate the confusion from the presence in Windows of two methods of restoring from an image - new and old.
Today on the program
How to enter Windows Recovery Environment
One of the differences between Windows 8 and Windows 7 was the placement of the recovery environment on the “System Reserved” partition. By clicking on the link, you will also find out in what cases it is created, and where Windows RE is stored in its absence.
Regardless of where the recovery environment is stored, the ability to enter it comes down to two options.
When the system boots
If there are no problems starting the system, the shortest path to the recovery environment is through start menu. The Reboot item has a hidden function that works when you click on it while holding down the Shift key. This method also works on lock and login screens, since Windows is already fully loaded.
Alternatives - this is the very bottom item in the Settings → Update and Recovery → Recovery or new /o key of the shutdown command:
Shutdown /r /o /t 0
It is curious (although logical) that when connected via RDP, these functions do not work, and they are not in the PC settings GUI.
The great thing about going into the Windows Recovery Environment from a booted system is that the options screen appears very quickly. It is only when you select one or another function that you reboot and actually log into Windows RE.
When the system won't boot
Another feature of Windows 8 and newer operating systems is automatic entry into the recovery environment when a number of problems occur with the system boot. If it doesn't work, you will need an installation disk or flash drive, or a recovery disk, just like in Windows 7.
![]()
Windows Recovery Environment Tools
As before, the recovery environment is built on, but there are more tools in it, which is associated with innovations in Windows 8.
Unfortunately, when translating the recovery environment interface into Russian, Microsoft did not pay enough attention to the unity of terminology. In the English OS everything is clear - in Windows RE and the control panel the function is called Refresh Your PC. And in a localized system there are already three options - “Recovery”, “Computer recovery” and “PC recovery”.

Of course, you only need to read what is written on the screen to understand that these three things mean the same thing. Moreover, the explanations in the recovery environment have become more detailed. Unfortunately, novice users often panic and get lost when they see the letters.
Restoring the computer to its original state appeared in Windows 8. And in the additional parameters, almost everything is the same as it used to be in Windows 7, plus boot options, which will be discussed below.
For those two poor guys with whom I started the story, system image recovery (bottom picture) did not find the computer recovery image (top picture). It’s good that they didn’t roll back to the original state, because there, along with the system disk, you can format all the others if you wish.
How to Enter Windows Safe Mode and Other System Boot Options
Boot options are only available when you start the recovery environment from a local disk (sign-in methods), because booting from the installation disk does not start the operating system, but rather a clean recovery environment.
There weren’t even enough function keys for all the options, but F10 hides only the entrance to... the recovery environment :) Most of the parameters should be familiar to you from Windows 7, but there are also innovations.
Point 8, with a clumsy translation into Russian, reveals a new protective measure that has appeared in Windows 8, aimed at combating kernel mode rootkits.
The presence of this item does not mean that the function is present on your PC. ELAM (Early Launch Antimalware) technology works in conjunction with another measure - UEFI (Secure Boot) designed to combat bootkits. The antivirus driver starts first and evaluates the security of other drivers. Based on this information, the Windows kernel decides whether to initialize them.
ELAM is available to third-party antivirus software developers, but the driver must be signed by Microsoft as part of the certification program, otherwise the kernel will not run it.
You can display the boot options screen every time you start Windows, which can be useful for testing or debugging. This is achieved with one command:
Bcdedit /set (globalsettings) advancedoptions true
How to create a recovery disk or flash drive
In principle, you don’t have to create anything special, but just take the installation disk, since now you can download it without problems. In any case, I strongly recommend that owners of PCs with Windows pre-installed lay down a straw in advance. In Windows 8, it became possible to create a flash drive with a recovery environment (thanks to reader Andrey Tishkin, who pointed this out in the comments).

How to run RAM diagnostics in Windows
I said above that in the additional parameters of Windows PE there are almost all the tools from Windows 7. The only thing missing there is memory diagnostics. In the recovery environment and in running Windows, it is called with the same simple command:
Diagnostics starts after reboot.
Expanding the recovery toolset
I have a recovery flash drive - this is a Windows installation disk, to which a Portable Soft folder with various diagnostic utilities has been added. Don’t forget that in Windows PE you can run many programs and utilities located on the hard drive, primarily system ones.
Just the other day, a question was asked in the forum about capturing and using WIM images when loading into Windows PE. I offered my instructions for creating a PowerShell disk, after which the participant revealed his cards. It booted from the installation disk, and the utility launched on the PE command line did not have the necessary functions.
In Windows 8, to get the full set of DISM capabilities, you need to add the entire utility folder to the recovery drive in advance. But you can go to the console in the system32 folder of the installed system and run the utility from there!
Discussion
I think that many readers have their own flash drive (or disk) with recovery tools in their arsenal. Tell us in the comments what it is based on and name 1-3 tools that you use most often.
(a hidden partition at the very beginning of the hard drive, 300 MB in size), also deleted the partition with factory settings and only then found out that both partition data may be needed when restoring the laptop. I found a way out of the situation - I created a partition with factory settings using , but how can I restore or re-create the Windows 8.1 recovery environment?
How to recreate Windows 8.1 Recovery Environment
Hello friends! We have created your own recovery partition with a reference image of Windows 8.1 containing all your programs, and linked this image to the recovery environment. Now, if complex system problems arise, you can roll back your Windows 8.1 computer to a reference image using a regular recovery environment and you don’t even need the Win 8.1 installation disc.
After the publication of the article, we received many letters from readers who, for some reason, do not have a hidden 300 MB partition with a recovery environment (a 300 MB partition is created when installing the system on a GPT hard drive, and a 350 MB partition is created on the MBR), and this means that they will not be able to use the advice from our article, but there is a way out. In today's article, I will show you how to recreate the recovery environment on a laptop or computer running Windows 8.1.
So, Disk Management of my laptop with UEFI BIOS and Windows 8.1 installed.
I delete the hidden partition with factory settings and the hidden partition of the recovery environment 300 MB
As a result, a hidden partition of 100 MB remains on the laptop’s hard drive. Healthy (Encrypted (EFI) system partition) FAT32, containing the boot storage configuration files (BCD), the Boot folder with the Windows 8.1 boot manager (bootmgr file), as well as the partition (C:) with Windows 8.1 installed.

The fact that we do not have a recovery environment can be checked on the command line.
Launch the command line as administrator and enter the command:
reagentc /info (The REAgentC.exe program is used to configure the Windows Recovery Environment boot image and recovery image). As you can see, our recovery environment is disabled,
Windows Recovery Environment Status: DisabledLet's try to enable the recovery environment with the command:
reagentc /Enable
and this does not work, since we have completely removed the recovery environment from the hard drive.
REAGENTC.EXE Windows Recovery Environment image not found

Let's create a partition with the recovery environment again! Friends, for this partition a size of 350 MB will be sufficient, but I will create a larger partition - 20 GB, since later I will also place a recovery partition on this partition with a WIM image file containing the reference Windows 8.1.
So, the partition is created and has a drive letter (E:)

Go to the drive (E:) and create a Recovery folder on it

Install a free archiver program 7-Zip, link to official website
http://www.7-zip.org/

Download the Windows 8.1 ISO image from the official Microsoft website and connect it to the virtual drive, open it.
In the sources folder of the Windows 8.1 distribution, find the install.esd file, right-click on it and select:
7-Zip-->Open archive

In the opened image file install.esd, open the folder X:\sources\install.esd\Windows\System32\Recovery\ (where X: virtual drive letter) and find the file Winre.wim(Windows recovery image), right-click on it and select Copy to...

Click on the explorer button.

In the explorer that opens, we find and indicate the one we created on disk (E:) Recovery folder and click OK.


The Winre.wim file is copied to the Recovery folder located on the drive (E:).

The file has the “hidden” and “system” attribute and you won’t see it just like that, to see the file, enable it in the system

display hidden and system files.

Open a command prompt as administrator and enter the command:
reagentc /setreimage /path E:\recovery(this command connects the recovery environment to the folder we created Recovery with file Winre.wim(Windows recovery image).
reagentc /Enable (enables the recovery environment)
reagentc /info (with this command we check the state of the recovery environment, we see that the recovery environment is enabled and is located on the partition (E:):
Windows Recovery Environment Status: Enabled
Windows Recovery Environment Location: \\?\GLOBALROOT\device\hardd
isk0\partition4\Recovery\WindowsRE